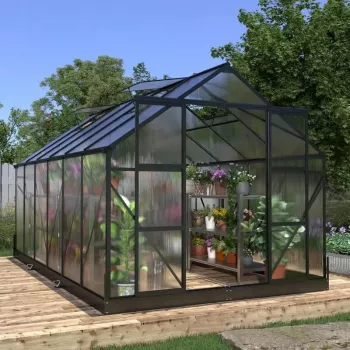
8×14 Polycarbonate Greenhouse Assembly Steps & Tools

How do you assemble an 8x14x7.5 ft polycarbonate greenhouse, and what tools are typically needed?
Assembly is easiest when it’s treated like a short project: prep the site, build a square base, erect the aluminum frame, then skin it with polycarbonate panels and finish with doors and vents. Before starting, choose a level location with good drainage and confirm local wind/snow considerations so you can anchor the structure appropriately.
Step-by-step assembly overview
1) Prepare the foundation. Mark out the 8×14 footprint, remove sod, and level the area. Many owners set the greenhouse on a treated lumber perimeter, pavers, or a concrete pad. The key is a flat, square base so doors slide properly and panels sit flush.
2) Inventory parts and pre-sort hardware. Lay out frame members, corner pieces, fasteners, glazing clips, and polycarbonate panels. Match labels to the manual and separate screws/bolts by size to avoid mix-ups mid-build.
3) Build the base frame and anchor points. Assemble the bottom rails on the ground, check diagonals for square, and loosely tighten fasteners until everything aligns. Anchor the base to your foundation using appropriate masonry anchors, ground anchors, or lag screws (depending on base type).
4) Assemble wall frames and roof structure. Install uprights, eave rails, and roof rafters. Work in sections, keeping everything plumb. Tighten fully only after the structure is squared and the roof ridge aligns.
5) Install polycarbonate panels. Confirm panel orientation (UV-protected side out if labeled). Use the provided channels/clips, and seal open flutes with vent tape (bottom) and foil tape (top) when recommended to reduce moisture and algae.
6) Add sliding doors and vent windows. Install tracks, rollers, handles, and stops; then hang the doors and adjust for smooth travel. Mount vent hinges and openers (manual or automatic) and confirm weatherstripping contact.
For a more detailed walkthrough tailored to this size and configuration, see the full guide here: 8×14 Polycarbonate Greenhouse Assembly Guide.
Tools typically needed
Common tools include: tape measure, carpenter’s square, level, rubber mallet, Phillips/flathead screwdrivers, hex keys (often included), socket set or nut drivers, cordless drill/driver with bits, step ladder, utility knife (for tape/packaging), clamps (helpful for alignment), and safety gear (gloves and eye protection). For anchoring, you may also need a masonry bit/hammer drill (concrete) or wrench set (ground anchors).
FAQ
Do you need a foundation for a polycarbonate greenhouse?
A firm, level foundation is strongly recommended because it keeps the frame square, helps doors operate smoothly, and gives you a reliable place to anchor against wind. Options range from pressure-treated lumber to pavers or concrete, depending on permanence and local weather.


Leave a comment