Automatic Rotating Ceramic Curler: Heat Guide & Tips

An automatic rotating-barrel curler can simplify styling by drawing hair around a heated ceramic surface while digital temperature control helps match heat to hair type. This guide covers what to look for, how to use it step by step, and how to get longer-lasting curls with less damage risk. For more guidance, see 8 Best Curling Irons, Tested by Our Experts – Consumer Reports.
What makes an automatic rotating-barrel ceramic curler different
Rotating barrel action helps wrap hair consistently without manual twisting, aiming for more uniform curl shape from section to section. With less wrist work, it can feel easier to repeat the same technique across your whole head. For further reading, see Chi Rotating Curling Iron.
Ceramic heating surfaces are designed to distribute heat more evenly than some bare metal finishes, which may help reduce hot spots that can overheat small areas of hair.
Digital temperature control lets you choose a specific heat level rather than relying on a single preset. That flexibility matters when switching between fine hair at the front hairline and denser hair at the back, or when working with color-treated strands.
This style of tool is especially helpful for quick everyday styling, beginners who struggle with clamp curlers, and anyone who wants repeatable results without a steep learning curve.
Featured picks from our store
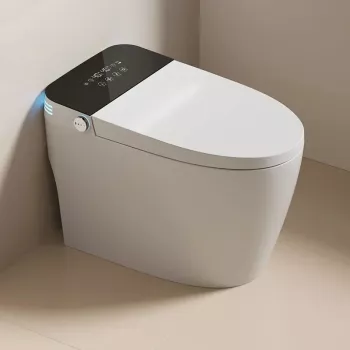
- Automatic Ceramic Hair Curler with Rotating Barrel & Digital Temperature Control — a straightforward option for consistent curls with adjustable heat.
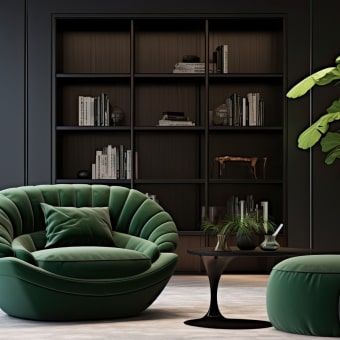
- Minimalist Acrylic Side Table — a sleek, easy-to-wipe surface that can work as a simple styling station next to a mirror (helpful when you want your tool and clips within reach).
Key features to pay attention to before styling
Temperature range and increments
Smaller step changes make it easier to find the lowest effective heat for your hair. When the temperature is “close enough,” it’s tempting to compensate with longer hold times or multiple passes—both of which can add unnecessary stress.
Heat-up time and stability
A fast heat-up is convenient, but stability is the bigger deal: consistent heat helps you curl each section once instead of going back over pieces that didn’t form evenly.
Barrel diameter and curl type
Barrel size shapes the result. Smaller barrels create tighter curls; larger barrels lean toward loose curls and waves. If the product page lists the barrel diameter, match it to your goal: springy definition vs. soft movement.
Direction control and rotation behavior
Being able to change rotation direction makes your finish look more natural. Many people prefer curling away from the face on both sides for lift, or alternating directions for a lived-in texture.
Cord length and swivel
A swivel cord helps prevent tangling as you reposition the tool around your head, especially when styling the back layers.
Temperature guide by hair type (start low and adjust)
Start at the lowest setting that forms a curl with a single controlled pass. Increase only if curls fall out quickly. Lower heat is typically best for bleached, highlighted, fragile, or very fine hair; higher heat can work for coarse, resistant hair, but reduce dwell time to compensate.
| Hair type / condition | Suggested start | Notes |
|---|---|---|
| Fine, fragile, or heavily processed | 250–300°F (120–150°C) | Use small sections; shorter hold time; prioritize heat protectant. |
| Normal / healthy hair | 300–360°F (150–180°C) | Increase gradually if curls relax too quickly. |
| Thick, coarse, or resistant hair | 360–410°F (180–210°C) | Use controlled timing; avoid repeated passes on the same strand. |
| Natural curls / textured hair (for smoothing then curling) | 330–390°F (165–200°C) | Work in smaller sections; ensure hair is fully dry before heat styling. |
How to use an automatic rotating-barrel ceramic hair curler
- Prep hair: Start with completely dry hair. Detangle, then apply heat protectant from mid-lengths to ends for more even coverage.
- Section: Divide hair into manageable layers. Smaller sections usually curl more evenly and hold longer.
- Set temperature: Choose a starting temperature based on hair type and wait until the tool fully heats before the first curl.
- Load a strand: Hold a 0.5–1 inch section (smaller for tighter curls). Keep ends aligned to prevent splaying or snagging.
- Engage rotation: Position the barrel so hair wraps smoothly. Keep light tension so the strand lays flat against the ceramic surface instead of twisting.
- Time the curl: Hold briefly, then release. If the curl is too loose, increase hold time slightly before raising the heat setting.
- Plan direction: Curl away from the face on both sides for a lifted look, or alternate directions for a more natural finish.
- Finish: Let curls cool before brushing out. Use a light mist hairspray for hold, or a small amount of styling cream for softer, touchable waves.
Techniques for smoother curls, more volume, and longer hold
Keep strands flat for shine
As the barrel rotates, guide the strand so it stays flat rather than rope-twisted. Flat wrapping reduces frizz and creates smoother curl “ribbons” that reflect light better.
Adjust where you start for volume vs. waves
For more root lift, start curling a bit closer to the root (without touching the scalp). For relaxed waves, begin mid-length and leave the ends slightly straighter.
Use a cool-set habit
Pair products with the finish you want
Safety and hair-health tips with heat tools
Cleaning, maintenance, and storage
Common issues and quick fixes
Curls fall out quickly
Hair snags or tangles
Uneven curl pattern
Frizz or dullness
FAQ
How to use automatic ceramic hair
Start with fully dry, detangled hair and apply heat protectant from mid-lengths to ends. Section hair, choose a low temperature to begin, then rotate a small strand with light tension, hold briefly, release, and let the curl cool before brushing or combing.


Leave a comment